
Flowcharts make complicated ideas easier to understand. Whether you’re documenting a business process, explaining a customer journey, or illustrating an application workflow, a good diagram often communicates more clearly than several paragraphs of text. But creating and maintaining diagrams can be time-consuming, especially when you’re working with WordPress.
Mermaid diagrams offer a different approach. Instead of drawing every shape manually, you describe a diagram using simple text syntax and let a tool generate the visual structure. What if you could take that Mermaid code, convert it into a visually editable flowchart, customize its appearance, and publish it directly on your WordPress website?
That’s exactly the workflow we’ll explore in this tutorial. We’ll use NinjaDraw, an Excalidraw-based WordPress diagram editor with Mermaid import support, to turn a text-based flowchart into a polished visual diagram.
What Are Mermaid Diagrams?
Mermaid is a text-based diagramming system that converts structured definitions into visual diagrams. Instead of manually positioning boxes and arrows, you write a short description of the relationships between elements. For example, a simple workflow might look like this:
flowchart LR
    A[Customer visits store] --> B[Select product]
    B --> C{In stock?}
    C -->|Yes| D[Add to cart]
    C -->|No| E[Notify customer]
    D --> F[Checkout]
The diagram describes a customer moving through an online shopping process. It contains regular steps, a decision point, and two possible outcomes. Mermaid is especially useful for developers, technical writers, educators, and teams that want to create diagrams from structured text.
Common applications include flowcharts, software documentation, system architecture, and business workflows. However, writing Mermaid code and publishing a visually customized diagram aren’t always the same task. That’s where visual editing tools can help.
Live Example: Mermaid Flowchart in WordPress
Let’s start with a practical example. The workflow below illustrates a simplified WooCommerce order process. Explore the flowchart below to see how Mermaid code can become a visual diagram published in WordPress.
Example of a Mermaid-generated flowchart customized in NinjaDraw and embedded as an SVG diagram.
Our example contains six main elements:
- Customer visits store.
- Customer selects a product.
- System checks availability.
- Available products are added to the cart.
- Unavailable products trigger a notification.
- The customer proceeds to checkout.
The original structure is generated from Mermaid syntax. With NinjaDraw Pro, you can import the flowchart into the visual editor, adjust its layout and appearance, and publish the result. Unlike a continuously rendered Mermaid code block, the published NinjaDraw diagram is an SVG representation of your saved visual design.
Turn Your Mermaid Flowchart into an Interactive Presentation
A flowchart doesn’t have to be just a static diagram. With NinjaDraw Presentation Mode, you can turn an imported Mermaid workflow into a step-by-step visual presentation. Instead of showing every process step at once, you can guide your audience through individual sections of the diagram, making complex workflows easier to explain.

For example, our WooCommerce order workflow can be presented in five stages:
- Customer Journey – Introduce the complete order workflow.
- Product Selection – Show how a customer selects a product.
- Availability Check – Explain the decision between available and unavailable products.
- Checkout Process – Follow the steps from adding a product to the cart to checkout.
- Order Complete – Highlight the successful outcome.
Interactive Flowchart Presentation
Use the navigation controls below to move through the presentation and explore the workflow one step at a time.
An interactive presentation created from a Mermaid flowchart using NinjaDraw.
This approach is useful for technical documentation, educational content, onboarding guides, and business process explanations. You can start with Mermaid syntax, customize the resulting diagram visually, and present it directly on your WordPress website.
Want to explore more presentation features? Read our guide to creating animated presentations in WordPress.
Why Use Mermaid Diagrams on a WordPress Website?
Mermaid is particularly useful when information naturally follows a sequence of steps or decisions.
Explain Complex Workflows
A flowchart can make processes easier to follow. For example, a WordPress tutorial might explain how a form submission moves through validation, notification, and confirmation. A visual diagram helps readers understand the relationship between those steps.
Create Technical Documentation
Developers frequently use diagrams to describe how applications work. Mermaid definitions can be maintained alongside technical documentation, then converted into visual diagrams for articles or knowledge bases.
Visualize Business Processes
Businesses can use flowcharts to document onboarding, order fulfillment, customer support, and internal approval processes. These diagrams are also helpful in training materials.
Turn Text-Based Ideas into Visual Content
If you already have a process described in structured text, Mermaid can reduce the effort needed to create the initial flowchart. You can generate the first layout and then customize it visually. This is particularly convenient when you want your diagram to match your website’s branding.
Three Ways to Add Mermaid Diagrams to WordPress
There are several approaches to publishing Mermaid diagrams. The best choice depends on whether you want to maintain the original Mermaid code, customize the diagram visually, or publish a simple static image.
Method 1: Use a Mermaid Rendering Plugin
Some WordPress plugins let you write Mermaid code directly in the block editor. The plugin renders the diagram on the page. This method works well when you want to maintain diagrams as code and frequently update their definitions. For example, a technical documentation website might store sequence diagrams or system architecture diagrams as Mermaid syntax. The main advantage is that the source remains text-based. However, the visual editing experience depends on the plugin. You may need to modify the Mermaid definition or styling configuration to change the layout.
Method 2: Export a Mermaid Diagram as an Image
Another option is to create a diagram using the Mermaid Live Editor, export it as SVG or PNG, and insert the file into WordPress. This approach is simple and doesn’t require a dedicated WordPress diagram plugin. It works well for occasional diagrams that rarely change. The limitation is that updates generally require editing the source diagram and exporting a replacement image.
Method 3: Import Mermaid into NinjaDraw
A third option combines text-based diagram generation with visual editing. With NinjaDraw Pro, you can import Mermaid flowchart syntax into an Excalidraw-based editor inside WordPress. Instead of treating the diagram only as source code or a flattened image, you can refine the imported visual elements. You can adjust the arrangement, edit labels, modify colors, and add extra annotations before publishing. This workflow is useful when you want the convenience of Mermaid for generating a starting structure and the flexibility of a visual editor for the finished design.
How to Create and Embed Mermaid Flowcharts in WordPress
Let’s walk through the complete process. We’ll create a basic e-commerce workflow, import it into NinjaDraw, customize it, and embed it in a WordPress page.
Step 1: Install NinjaDraw
Start by installing the free NinjaDraw plugin.
- Open your WordPress dashboard.
- Navigate to “Plugins” -> “Add New Plugin”.
- Search for “NinjaDraw”.
- Install and activate the plugin.
- Open the NinjaDraw dashboard.
The free version includes a visual diagram editor, drawing tools, and the ability to publish diagrams. Mermaid Import requires NinjaDraw Pro. If you want to follow the Mermaid conversion workflow, activate the Pro version before continuing.
Step 2: Create a Mermaid Flowchart
We’ll use a simplified e-commerce checkout process. Copy the following Mermaid definition:
flowchart TD
    A[Customer visits store] --> B[Select product]
    B --> C{Product available?}
    C -->|Yes| D[Add to cart]
    C -->|No| E[Show unavailable]
    D --> F[Proceed to checkout]
    F --> G[Order complete]
The flowchart TD declaration tells Mermaid to organize the diagram from top to bottom. Each letter represents a diagram node. Square brackets define regular steps, while curly braces create a decision node. Arrows connect the individual steps. Labels such as Yes and No describe alternative paths. You can experiment with this code in the Mermaid Live Editor before importing it into WordPress.
Step 3: Import Mermaid Code into NinjaDraw
Open the NinjaDraw editor and create a new diagram. Use the Mermaid Import feature available in NinjaDraw Pro. Paste your Mermaid definition into the import interface and run the conversion. NinjaDraw will generate a visual flowchart from the Mermaid structure.

You now have a starting diagram that can be customized in the visual editor. The important difference is that you’re no longer limited to adjusting the diagram through its text definition. You can use the drawing tools to refine the composition.
Tip: Start with a relatively small flowchart. A diagram with five to eight steps is easier to read and customize than one containing dozens of closely connected elements.
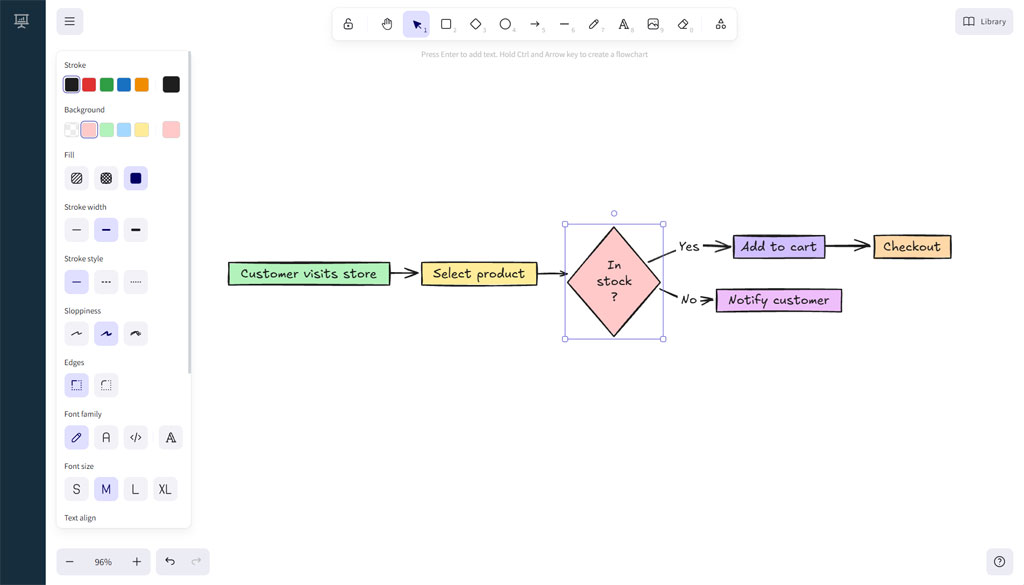
Step 4: Customize the Flowchart Visually
Once the imported flowchart appears on the canvas, you can adjust its design.
For example:
NinjaDraw uses an Excalidraw-based editor, giving diagrams a recognizable hand-drawn appearance. You can choose a simple technical style or a more informal presentation that matches your content. This makes the most important information easier to recognize.
Step 5: Save the Diagram
After customizing the visual layout, save your diagram in NinjaDraw. The plugin manages saved diagrams within your WordPress installation. This means you can return to the diagram later and make changes without rebuilding the entire visual from scratch. For example, if your checkout process changes, you can open the existing diagram and add another step.
One important distinction: editing the saved NinjaDraw diagram is different from automatically synchronizing it with the original Mermaid source. The imported diagram should be treated as an editable visual document, not a live two-way connection to the Mermaid definition.
Step 6: Embed the Diagram in WordPress
Once your flowchart is ready, publish it using the NinjaDraw shortcode [ninjadraw id="123"] or Gutenberg block. Replace 123 with the actual ID of your saved NinjaDraw diagram. Open the page or post where you want the diagram to appear. Add a Shortcode block, paste the shortcode, and publish or update the page. You can also use the NinjaDraw Gutenberg block where appropriate. NinjaDraw publishes optimized SVG output on the frontend, so the visitor doesn’t need to load the full Excalidraw editor to view a static diagram.
Step 7: Test the Diagram on Different Devices
Open the published page on desktop and mobile.
Check that:
SVG is particularly useful here because vector elements retain their clarity when scaled. However, very large flowcharts can still be difficult to read on small screens. If the diagram becomes too crowded, consider simplifying it or splitting it into smaller diagrams.
Mermaid Rendering vs Visual Editing: Which Should You Choose?
Mermaid renderers and visual diagram editors solve related but different problems.
| Feature | Mermaid Rendering Plugin | NinjaDraw |
|---|---|---|
| Create diagrams from text | Yes | Mermaid Import |
| Maintain Mermaid code as source | Yes | Not as a live two-way sync |
| Visual editing | Depends on plugin | Excalidraw-based editor |
| Hand-drawn diagram style | Depends on theme | Yes |
| Add custom visual annotations | Depends on renderer | Yes |
| Publish in WordPress | Yes | Gutenberg and shortcode |
| Frontend output | Depends on renderer | Optimized SVG |
| Best for | Code-first documentation | Visually customized diagrams |
If your priority is maintaining a large collection of diagrams directly from Mermaid code, a dedicated Mermaid rendering plugin may be more suitable. If your priority is starting from Mermaid syntax and creating visually polished diagrams that you can continue editing in WordPress, NinjaDraw is an alternative worth considering.
Where Can You Use Mermaid Flowcharts?
The same workflow can be adapted to many types of content.
Software Architecture and Technical Guides
Show how services communicate, how user requests move through a system, or how an application handles different states. A flowchart can complement API documentation and developer tutorials.
WooCommerce Workflows
Visualize the customer journey from browsing products to checkout and order confirmation. You can also illustrate fulfillment or refund processes.
Customer Support Processes
Show how incoming requests are categorized, escalated, and resolved. These diagrams are useful for internal documentation and onboarding materials.
Educational Content
Teachers can explain decision trees, learning processes, and step-by-step procedures. The Excalidraw-style presentation can make technical material feel more approachable.
Project Planning
Use diagrams to explain team workflows, approval processes, and project milestones. Flowcharts are useful whenever a process contains distinct steps or branching decisions.
Best Practices for Publishing Flowcharts
Keep Each Diagram Focused
A diagram should communicate one main idea. Avoid combining unrelated workflows into a single complex chart.
Use Consistent Shapes
Use rectangles for actions and diamonds for decisions. Consistent visual conventions make diagrams easier to understand.
Choose Readable Labels
Keep text concise, but avoid abbreviations that readers may not recognize.
Use Color to Communicate Meaning
Color can distinguish different types of steps, but it shouldn’t be the only way to identify them. Use labels and shapes as well.
Provide Context Around the Diagram
Introduce each flowchart with a short explanation. If the diagram contains important instructions, include the relevant information in accessible text outside the visual.
Review Diagrams After Content Changes
When a documented process changes, update the corresponding diagram. An outdated flowchart can be more confusing than having no diagram at all.
Create Mermaid-Based Flowcharts with NinjaDraw
Mermaid is a convenient way to define workflows using structured text. NinjaDraw extends that workflow by letting you take a Mermaid flowchart, refine it visually in an Excalidraw-based editor, and publish it directly on your WordPress website. You can start with a few lines of text, customize the resulting diagram, and embed a lightweight SVG in your content. If you want to build diagrams manually, the free version of NinjaDraw provides a useful starting point. For Mermaid importing, native Excalidraw file support, and additional advanced features, explore NinjaDraw Pro.
Still not using NinjaDraw?
F.A.Q.
Your Questions, Answered
Can I add Mermaid diagrams to WordPress?
Yes. You can use a Mermaid rendering plugin, export a diagram as an SVG or PNG image, or import a supported Mermaid flowchart into NinjaDraw Pro and publish the resulting visual.
Does NinjaDraw support Mermaid diagrams?
NinjaDraw Pro includes Mermaid Import, allowing you to turn Mermaid flowchart definitions into diagrams that can be customized using its visual editor.
Is Mermaid Import available in NinjaDraw Free?
No. Mermaid Import is a Pro feature. The free version lets you create and publish diagrams manually using the built-in drawing tools.
Can I edit a Mermaid flowchart after importing it?
Yes. You can refine the imported diagram using NinjaDraw’s visual editor. This is different from maintaining a live connection to the original Mermaid definition.
Can I embed NinjaDraw diagrams in Elementor?
Yes. You can use the NinjaDraw shortcode in an Elementor Shortcode widget or another compatible page builder.
Are NinjaDraw diagrams responsive?
NinjaDraw displays diagrams using SVG output, which remains sharp when scaled. You should still check that the diagram’s labels and overall layout are readable on mobile devices.
Does NinjaDraw require an external diagram hosting service?
No. NinjaDraw stores its diagrams within your WordPress installation and publishes them on your website.
Does NinjaDraw support every Mermaid diagram type?
NinjaDraw’s documented Mermaid Import feature is intended for flowchart conversion. Don’t assume every Mermaid diagram type is supported without testing it in the current plugin version.
What’s the difference between Mermaid and Excalidraw?
Mermaid describes diagrams using structured text. Excalidraw is a visual editor in which you arrange and customize shapes, arrows, and other objects. NinjaDraw combines Excalidraw-based editing with Mermaid import capabilities in its Pro version.


